Working with Kolibri from the command line#
In Windows you need to open the command prompt, for example by using the WIN + R shortcut, and then typing
cmd.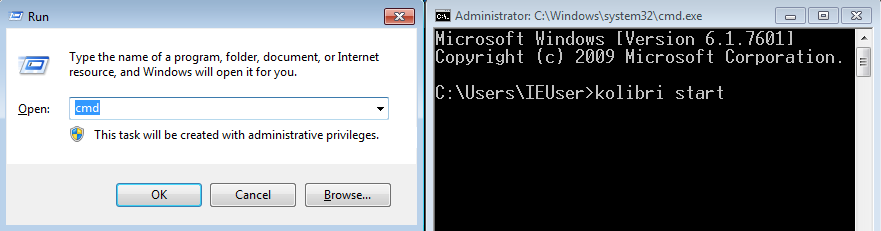
On macOS open Spotlight and type
Terminal. You may also need to prefix the commands withpython -m, for examplepython -m kolibri start.If you are running Kolibri with the
.pexfile, make sure to substitute thekolibriin below commands with the exact name of the file you downloaded preceded by./. For example, to start Kolibri from the downloaded filekolibri-v0.14.pex, type./kolibri-v0.14.pex start.
Warning
In the commands below, angle brackets and the text between them <...> are used to denote placeholders for you to modify. Make sure to replace them with your own information.
If you see errors in the prompt/terminal output while running the commands below, ask for help at our Community Forums, or file an issue on GitHub.
Start/Stop Kolibri#
In case you need to troubleshoot potential problems while running Kolibri, you may try to start it manually from the command line.
kolibri start --debug --foreground
kolibri stop
Import channels from Internet#
To import channels from Internet, run these two commands in sequence. The first downloads the channel database, and the second downloads the resources (videos, documents, etc.).
kolibri manage importchannel network <Channel ID>
kolibri manage importcontent network <Channel ID>
For example (Channel ID without angle brackets <...>):
kolibri manage importchannel network a9b25ac9814742c883ce1b0579448337
kolibri manage importcontent network a9b25ac9814742c883ce1b0579448337
Warning
When you import channels from the command line, you still must use the 32 digit channel ID, as the command will not work with the token. Make sure to receive the correct channel ID from the person who curated the unlisted channel you need to import, or refer to Kolibri Studio user guide how to find it in Studio user interface, if you have channel editor access.
Import channels from local drive#
To import channels from a local drive (hard disk or an external USB unit, for example), run these two commands in sequence. Drive you are importing from should have a folder KOLIBRI_DATA at the root, with Kolibri content inside.
kolibri manage importchannel disk <Channel ID> /path/to/local/drive/KOLIBRI_DATA
kolibri manage importcontent disk <Channel ID> /path/to/local/drive/KOLIBRI_DATA
For example on Linux:
kolibri manage importchannel disk a9b25ac9814742c883ce1b0579448337 /media/MyDrive/KOLIBRI_DATA
kolibri manage importcontent disk a9b25ac9814742c883ce1b0579448337 /media/MyDrive/KOLIBRI_DATA
Or on Windows:
kolibri manage importchannel disk a9b25ac9814742c883ce1b0579448337 Z:\KOLIBRI_DATA
kolibri manage importcontent disk a9b25ac9814742c883ce1b0579448337 Z:\KOLIBRI_DATA
Import channels from local network#
To import channels from another device on your LAN, run these two commands in sequence.
kolibri manage importchannel network <Channel ID> --baseurl <fullPrefixIP>
kolibri manage importcontent network <Channel ID> --baseurl <fullPrefixIP>
For example:
kolibri manage importchannel network a9b25ac9814742c883ce1b0579448337 --baseurl http://192.168.2.25:9090/
kolibri manage importcontent network a9b25ac9814742c883ce1b0579448337 --baseurl http://192.168.2.25:9090/
Export channels#
To export Kolibri channels on a local drive in order to share it with another device, run these two commands in sequence. The first exports the channel database, and the second exports the resources (videos, documents, etc.).
kolibri manage exportchannel <Channel ID> /path/to/local/drive/KOLIBRI_DATA
kolibri manage exportcontent <Channel ID> /path/to/local/drive/KOLIBRI_DATA
The path should be to a folder named KOLIBRI_DATA at the root of the local drive, so it will get picked up later for importing via the Web UI.
Reorder channels#
You can set the specific order for channels in the Learn page according to your preferences. Follow these steps.
To view the current ordered list of channels, run the command:
kolibri manage listchannels
The output will be something like:
Pos       ID                                      Name
---       --                                      ----
1         95a52b386f2c485cb97dd60901674a98        CK-12 Testing
2         a9b25ac9814742c883ce1b0579448337        TESSA - Teacher Resources
To set a position for a channel, run the command:
kolibri manage setchannelposition <Channel ID> <Pos>
Example with the above channels:
kolibri manage setchannelposition a9b25ac9814742c883ce1b0579 1

Pos       ID                                      Name
---       --                                      ----
1         a9b25ac9814742c883ce1b0579448337        TESSA - Teacher Resources
2         95a52b386f2c485cb97dd60901674a98        CK-12 Testing
Delete channels#
To delete Kolibri channels on your local drive in order to free hard drive space on the device, run the following command.
kolibri manage deletechannel <Channel ID>
Create a new super admin#
In case you need to create another super admin user, either to address additional need of managing facility, or if you lost the password for the old one, run the following command.
kolibri manage createsuperuser
You will be prompted to input the Username and Password and the new super admin user account will be created.
The full name for the new super admin user will be the same as the chosen username, and can be edited in the Facility > Users page, or the user profile.
Import and export user data from a CSV File#
This feature is also available from the Kolibri user interface in the Facility > Data tab. It is recommended you read the section of this guide which documents the feature, especially the part about the CSV format before you try this command line utility.
Import from CSV#
Execute the dry-run of the command to review the report containing the number of users and classes to be created, updated or deleted, and see the list of any potential errors.
kolibri manage bulkimportusers --dryrun my-school-users-2021.csv
Run the command and review that the changes are visible in the Facility dashboard.
kolibri manage bulkimportusers my-school-users-2021.csv
If the CSV file does not contain all the non admin users or classes currently in the facility, using the --delete flag will remove them during the import process.
kolibri manage bulkimportusers --delete my-school-users-2021.csv
Export to CSV#
Run the following command to create a users_<date>_<time>.csv file.
kolibri manage bulkexportusers --overwrite --output-file=my-school-users-2021.csv
To export a CSV file with localized headers, use the --locale flag.
kolibri manage bulkexportusers --overwrite --output-file=lista-estudiantes-2021.csv --locale=es_ES
Change user’s password#
Run the following command to change the password for a user.
kolibri manage changepassword <username>
You will be prompted twice to input the new password for the user.
Delete users permanently#
If you need to permanently delete a Kolibri user and all the data associated with their account, for example to ensure privacy rights according to GDPR, use the following command.
kolibri manage deleteuser <username>
Warning
This will permanently erase all the user data.
Export data logs#
If the data logs export process from Facility > Data is taking a long time, use the following command to export logs from the terminal or command prompt.
kolibri manage exportlogs --log-type summary
kolibri manage exportlogs --log-type session
Backup and restore Kolibri database#
Kolibri automatically creates a backup of the database with every version upgrade. If for some reason you need to make a manual backup, use the following command.
kolibri manage dbbackup
This command will create a time-stamped .dump file in the ./kolibri/backups folder that you can use to restore the database with the following command.
kolibri manage dbrestore --latest
To restore the DB from a specific .dump file, use the flag --select to see all that available sorted by date, and select the one you need.
kolibri manage dbrestore --select
Warning
This command is not intended for replication across different devices, but only for restoring on a single device from a local backup of the database.
Change the location of Kolibri channels files#
Kolibri channels may occupy a considerable amount of hard disk space over time. If you have concerns about running out of storage on your device, you can move the Kolibri channels to another drive.
Tip
If you have both SSD disk and HDD disk available on your device, it is recommended to install Kolibri on the SSD drive to allow faster access to the database, and move just the channels to the HDD drive.
To move the folders with Kolibri channels to another location, follow these steps.
Stop Kolibri.
kolibri stopCreate a new folder that will contain all the channels’ files and resources on the destination drive.
kolibri manage content movedirectory <destination>
For example, if you created a new folder
KolibriChannelson an external drive, run this command.kolibri manage content movedirectory /mnt/my_external_drive/KolibriChannels
If you are on Windows, and the new folder
KolibriChannelsis on the driveF:, run this command.kolibri manage content movedirectory F:\KolibriChannels
Restart Kolibri.
This command will move the 2 subfolders databases and storage, from their default location inside the .kolibri/content folder in your device’s home directory, to a new location you specified in the command.
Change the location of ALL Kolibri files#
If you want to change the directory where all of Kolibri’s runtime files are located, together with the imported channels, you need to change the environment variable called KOLIBRI_HOME to the path of your choice.
If the variable is left unset, by default, Kolibri’s runtime files and channels will be placed in your user’s home folder, under the .kolibri subfolder.
Note
Adjusting this environment variable behaves differently than the movedirectory command above:
Adjusting the environment variable will not automatically migrate over data. You need to copy the
.kolibrifolder manually to the new location.If you do copy the
.kolibrifolder, the channels will not be affected if it had been previously set using themovedirectorycommand.
There are many ways to set an environment variable either temporarily or permanently. To start Kolibri on OSX or Linux with a different home, follow these steps.
Stop the server.
Move the
.kolibrifolder to the new location.Run the following in Terminal:
KOLIBRI_HOME=/path/to/new/home kolibri start
When you start the server again, all your files should be seamlessly detected at that location.
To change the environment variable KOLIBRI_HOME on Windows, follow these steps.
Stop the server.
Move the
.kolibrifolder to the new location.Run the following in Command Prompt:
setx KOLIBRI_HOME "/path/to/new/home"
Restart the server, and your files should be seamlessly detected at the new location.
Alternatively, you can follow these steps in the GUI.
Go to Computer > Advanced System Settings and press the Environment Variables button.
Under User Variables for… press the New… button.
Input
KOLIBRI_HOMEin the Variable name field, and your new path in the Variable value field, and press OK on both open windows.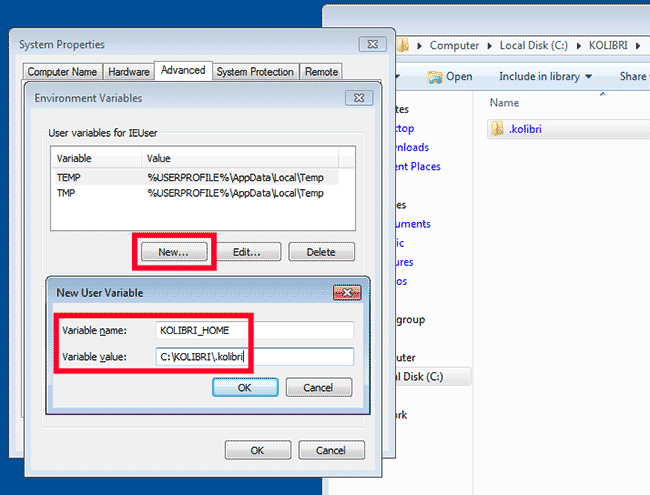
Restart Kolibri.