Quizzes#
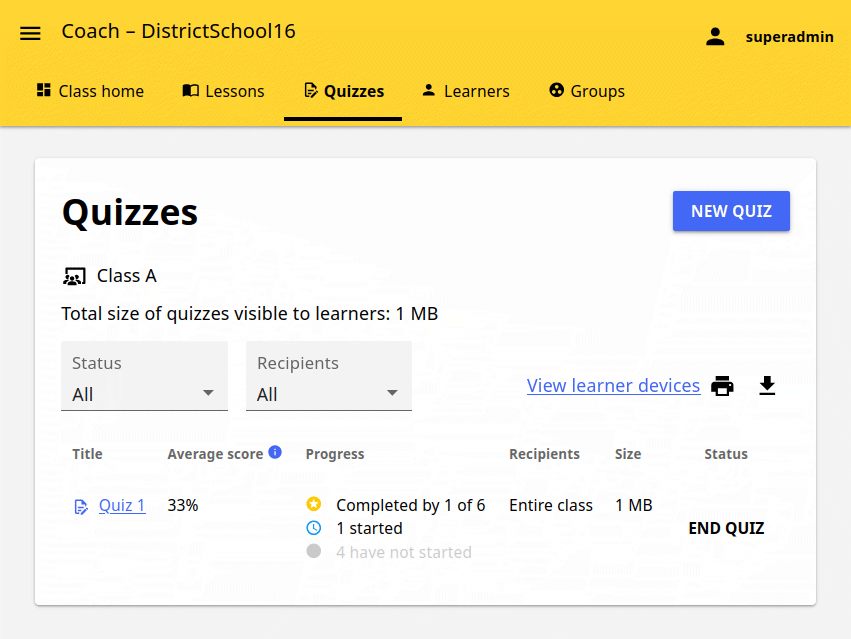
You can view, create and delete quizzes, assign them to learners, as well as access the progress reports on resources included in each quiz, in the Quizzes tab of your Coach dashboard. The default view displays the list of all quizzes in the selected class, their size, average score, groups they are assigned to, and their status and progress indicators.
Note
To manage Quizzes in Kolibri classes and groups you must sign in as coach, admin or super admin.
Manage quizzes#
Create new quiz#
To create a new quiz, click the NEW QUIZ button and select Create new quiz.
Fill in the field for the quiz title in the Create new quiz page.
Select the Report visibility to learners: either after each learner submit their quiz, or after the coach ends the quiz.
Select the learners and groups to whom you wish to assign the quiz under the Recipients heading.
- Quiz can have one or more sections.
You can choose between Randomized and Fixed section order (default).
Click the + ADD SECTION button to add more sections to the quiz.
Click the + ADD QUESTIONS button to select and add questions from exercise resources in the library.
Adjust the number of questions you want the quiz to contain. You can use the arrow field value modifiers with the mouse, or - and + buttons if you are using the keyboard.
The default value is 10, and it is not recommended that you add more than 25 questions to a section.
When you proceed, Kolibri will automatically add the chosen number of questions from the exercise resources you select in the next step.
Activate the Choose questions manually if you prefer to select the individual questions manually (instead of letting Kolibri add random questions from the selected exercise resources).
Click the CONTINUE button.
Select a channel from the library, navigate through the topic tree and activate checkboxes of the exercises you want Kolibri to add questions from, to include in the quiz.
At the bottom of the page you can see the link (number) resources selected that allows you to review and change the selected resources.
Use the Search feature to look for topics and exercises about a specific subject.
Write the search term in the field, press the ENTER key or click the (search) button to display the results.
You can filter the search results by category of resource, include only those from a specific language or level.
When you are done, click the + ADD (number) QUESTIONS to return to the main view of the quiz.
There are several features to help you work with questions:
Click on the question title to expand and review the full content of the question, and click the title again to collapse it back.
Use the (collapse all) and (expand all) buttons to open and close the full content of all questions in the section.
Select and auto-replace or manually replace questions from the same resources you selected in the steps above.
Select and remove questions from the section.
Reorder the questions in the section by using the (drag) button with the mouse (drag and drop), or with (up) and (down) buttons if you navigate by keyboard.
Use the OPTIONS button to access the Edit section, Delete section, and Add more questions features.
Click SAVE button to save the current state and continue adding or reordering questions, or the SAVE & CLOSE button, to finish editing the quiz (you will see a confirmation notification at the bottom).
Start and end quiz#
Newly created quizzes are by default not started, meaning that learners will not see them in the Learn > Classes view.
Click the START QUIZ button to enable learners to see the quiz and start answering the questions. Button will change the label to indicate that the quiz is now opened for learners, and can be ended.
Click the END QUIZ button once the designated time had passed, and you want to stop learners from interacting with it.
Warning
You can edit all the quiz features, including adding and changing questions, until you start the quiz. Once the quiz is started you will be able to edit the title, visibility of the report, recipients and the order of sections, but you will not be able to add or change the questions.
Change quiz recipients#
Newly created quizzes are by default visible to entire class. To change quiz Recipients, that is select groups or individual learners instead of the whole class, follow these steps.
Click to open a quiz from the list in the Quizzes tab.
Click the (options) button and select Edit details option.
Select the learners and groups to whom you wish to assign the quiz under the Recipients heading.
Click SAVE button to save the current state and continue editing, or the SAVE & CLOSE button, to finish editing the quiz (you will see a confirmation notification at the bottom).
Copy quiz#
To copy a quiz to a different group or another class, follow these steps.
Click to open a quiz from the list in the Quizzes tab.
Click the (options) button and select Copy quiz option.
Select the class to which you wish to copy the quiz to and click CONTINUE.
Select the entire class, groups or inidividual learners to whom you wish to assign the quiz under the Assign quiz to heading.
Click COPY to confirm, or CANCEL to exit without change.
If the quiz is copied to another group in the same class, it will appear in the Quizzes tab as the Copy of…. Follow the steps in the next section to rename it.
Rename quiz#
To rename quiz, follow these steps.
Click to open a quiz from the list in the Quizzes tab.
Click the (options) button and select Edit details option.
Change the quiz title and/or the description.
Click SAVE button to save the current state and continue editing, or the SAVE & CLOSE button, to finish editing the quiz (you will see a confirmation notification at the bottom).
Delete quiz#
To delete quiz, follow these steps.
Click to open a quiz from the list in the Quizzes tab.
Click the (options) button and select Delete option.
Click DELETE in the confirmation window to proceed, or CANCEL to exit without deleting the quiz.
Warning
All data from the quiz you are deleting will be lost.
View learner progress in quizzes#
In the main view of the Quizzes tab you can view the summary of the progress for all quizzes created in the class.
Average score in the first column is calculated only from quizzes that were completed.
Progress column presents the summary of learners that started and completed each quiz.
The Status column indicates whether the quiz is opened for learners (whether they can still answer the questions), or whether the quiz has ended. It also indicates whether the quiz is still visible to learners in the Learn > Classes view.
Click on the quiz title to review progress in detail.
In the Learners sub-tab, you can see the list of learners, with columns for the progress and obtained score.
Open the Difficult questions sub-tab to view the list of questions learners gave incorrect answers to, and gain insight of how many need help with the concept.
Click a difficult question in the list to review each of the incorrect answers and attempts.
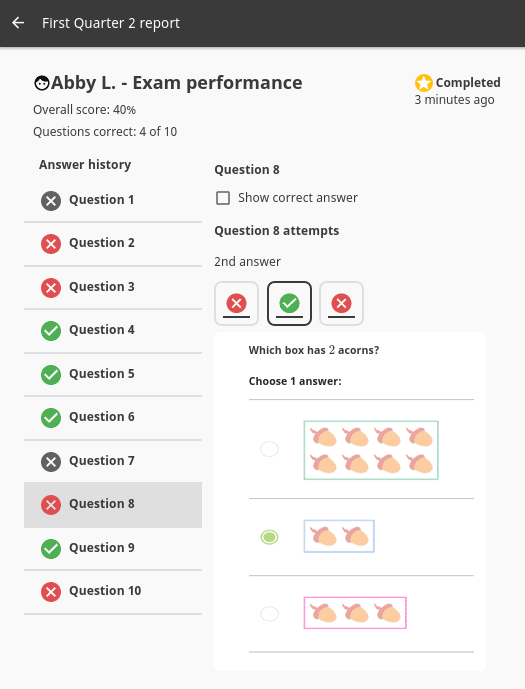
When you click a name of a single learner, you can see the full report for each answer. This can help you understand which questions learners had difficulties answering correctly, and how many attempts they used.
green check mark icon indicates the correct answer
red X mark icon indicates the incorrect answer
gray X mark icon indicates an unanswered question
Print and export coach reports#
Whenever you see the (print) and (download) buttons, you will be able to print the report on paper, save in a PDF format, or export as a CSV file, for further analysis or to share with others. Follow these steps.
Click the (print) button for the report you want to print or save as PDF file on your local drive. You will either have to select your paper printer device, or the Save as PDF option in the print dialog.
Click the (download) button for the report you want to export as CSV file on your local drive.