Provisioning many servers
This tutorial will help you to prepare for the Kolibri implementation where you need to install and provision several Kolibri server devices with the same channels.
Provisioning multiple servers with software and channels is going to take some time regardless of the chosen procedure.
You will need an active Internet connection only to preload channels on the first server device. Provisioning the rest of the servers can be accomplished offline, or just within the working local network.
Required hardware
Laptops and/or other devices to host Kolibri servers.
For provisioning you have the option to use:
Fast USB 3 external drive(s). USB 2 can work too, but we recommend using more than one USB 3 drives for fastest results.
OR
Working LAN (cabled is preferable to wireless, and ideally via a router that supports Gigabit ethernet).
Active Internet connection to download the installer and preload channels on the first (“main”) server.
We recommend you install and preload channels on one server (referring to it as the main for the purpose of this procedure), and then copy the required folder structure to the rest of the devices.
Copying the folders with channels from the main server hard drive to others via the USB 3 external drive might be faster, but copying via the cabled LAN connection may be done in parallel (from main to several others at the same time). You can combine these two options for the fastest results, if you have access to both cabled LAN and the USB external drives.
Provision the main server
- Install Kolibri on the main server by following the steps for your chosen platform.
- Proceed with the Initial setup of the facility on the main server.
- Import the desired channels to preload it on the main server.
Kolibri folder structure
At this point you have the main server set-up and preloaded with channels. Before you proceed to copy the channels and the database to the rest of the server devices, let’s get familiar with the Kolibri folder structure.
On Windows, the main server database and all the files related to the channels are stored in the folder named
.kolibri, located inC:/Users/<username>/.kolibri/(if your main hard drive isC:).<username>refers to the user on your operating system that installed Kolibri as explained above. In the image below for example, you can see that the user who installed Kolibri is called IEUser.
Find the .kolibri folder on Windows.
On Linux the
.kolibrifolder is located inside your user home folder.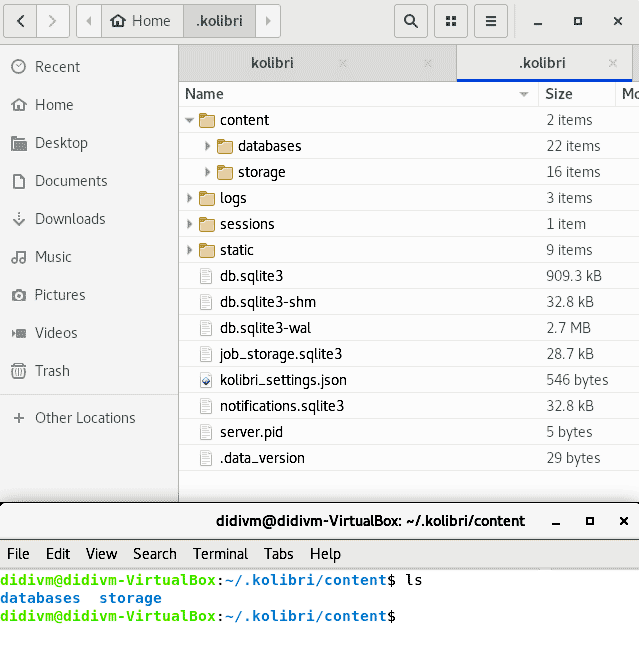
Find the .kolibri folder on Linux.
The contents of the .kolibri folder is the same for all platforms. Inside you can see the main database file db.sqlite3, and the subfolder named content which contains 2 subfolders: databases with the separate database for each of the channels imported into Kolibri, and the storage folder with all the resources files.
Find the folder with channel’s databases and resources.
Prepare the .kolibri folder for copying
Before you proceed to copy the .kolibri folder from the main server hard drive (which already contains channels), to the rest of the server devices for your implementation, you need to deprovision (that is, empty out) the user database.
Warning
This is a critical step, to ensure that each destination server has a unique Facility ID (and name) associated with it.
Open the Terminal on Linux or the command prompt on Windows.
Stop Kolibri server with the following command
kolibri stopFollow that with the command to empty the user database.
kolibri manage deprovision
You will have to confirm twice by typing
yesand pressing the Enter key.
Copy the channels to other server devices
Warning
Independent from the copying procedure you decide to use, you should first proceed to install Kolibri on each of the destination devices, following the same steps as for the main server, but you don’t need to go through the Initial Setup.
After the installation you must stop Kolibri on the destination device, before you proceed to copy the channels.
- On Windows you need to right-click the Kolibri icon in the Windows taskbar (usually at bottom right, near the clock), and select
Exit. You will be prompted to confirm the selection, after which Kolibri will stop.

Stop Kolibri from the taskbar options.
- On Linux you need to run
kolibri stoporsudo service kolibri stop(if you installed Kolibri to run as the system service).
- On Windows you need to right-click the Kolibri icon in the Windows taskbar (usually at bottom right, near the clock), and select
Use the external USB drive to copy channels
Copy the
.kolibrifolder from the main server hard drive, and paste it on the external USB drive.Copy the
.kolibrifolder from the USB drive, and paste it inside the destination device hard drive.Note
On Windows you need to copy the
.kolibrifolder into theC:/Users/<username>/folder, where the<username>is the account you were logged in as when you installed Kolibri on that destination device (it may be different from the account on the main server). On Linux you need to copy inside the home folder of the user who installed Kolibri, or is the owner of the Kolibri system service.Warning
You should see an alert message that there is already a
.kolibrifolder on the destination device: choose the option to overwrite it.
Use the cabled LAN connection to copy channels
Connect all the devices, main server and the others where you need to copy the channels on, to the same local area network (LAN).
Configure the network access on the main server, so the rest of the devices can:
- See it among their Network locations in the Windows Explorer
- Open it and freely browse its shared folders (
.kolibrifolder should be shared)
Use the Windows or File Explorer on each destination device to copy the
.kolibrifolder from the main server hard drive, and paste it inside the destination device hard drive.Note
On Windows you need to copy the
.kolibrifolder into theC:/Users/<username>/folder, where the<username>is the account you were logged in as when you installed Kolibri on that destination device (it may be different from the account on the main server). On Linux you need to copy inside the home folder of the user who installed Kolibri, or is the owner of the Kolibri system service.Warning
You should see an alert message that there is already a
.kolibrifolder on the destination device: choose the option to overwrite it.You should be able to access the main server from several other destination servers through the LAN, and copy the
.kolibrifolder at the same time.
Restart Kolibri servers on destination devices
- On Windows double-click the desktop shortcut to start Kolibri after copying channels. You will see the notification message Kolibri is starting, please wait…. When you see the next notification that Kolibri is running…, Kolibri will open in the browser with the URL
http://127.0.0.1:8080. - On Linux open the Terminal and run
kolibri startorsudo service kolibri start(if you installed Kolibri to run as the system service).
Since the deprovision command emptied the user database on the main server, you will need to perform the Initial setup on each destination device to set their Facility name and the super admin account. The Facility name could be the name of the learning center or school in which the respective server will be implemented.